
The No Code API with Cloudant, Node Red, and IBM API Management
The No Code API with Cloudant, Node Red, and IBM API Management
This blog post is to show you how quickly you can build a secure API on IBM Bluemix using Node Red and IBM API Management that lets you connect to a Cloudant database to access a view. The great part about this is that we are going to do this with almost no code. What we are going to do is create a secure API that will run a map reduce view of a Cloudant database that contains some made up toll booth data. In this scenario our database contains entries for cars paying tolls and we want to build an API that returns the total tolls collected at each toll plaza.
To get started create a Bluemix application using the Node Red Starter on Bluemix. Once you have your Node Red Starter running on Bluemix we are going to go ahead and create a Cloudant database to hold our toll both data and for us to construct a view. The database that we are going to create will contain some sample automobile toll booth data. From the Bluemix dashboard open up the Cloudant service that was bound to your application and open the dashboard and create a new database called tolls. Here is the backed up copy of my tolls database that you can use to restore into your Cloudant toll database. Here is a pointer to a Cloudant backup and restore utility you can use to help you restore the database entries from my copy of the database into your Cloudant database. Be certain to not delete the “nodered” database in your Cloudant instance as this database contains your Node Red flows.
Now we will create a view in our tolls Cloudant database. To do this you need to create a design document and construct a map function that collects all the tolls for each plaza and a reduce function to add up all the tolls collected for each plaza. To create the design document open the database in the Cloudant dashboard and from “All Documents” select “New View”. Here is a screenshot showing you how to do this.
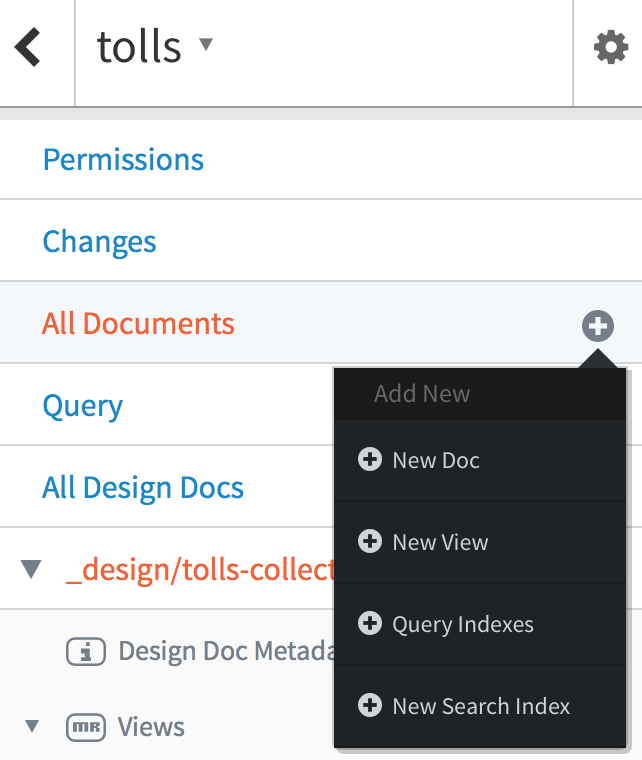
Creating a Design Document
Here is a screenshot that shows the map and the reduce functions for the tolls database. In this example the name of the design document and index is “tolls-collected”, but you are free to name the design document and view as you wish.
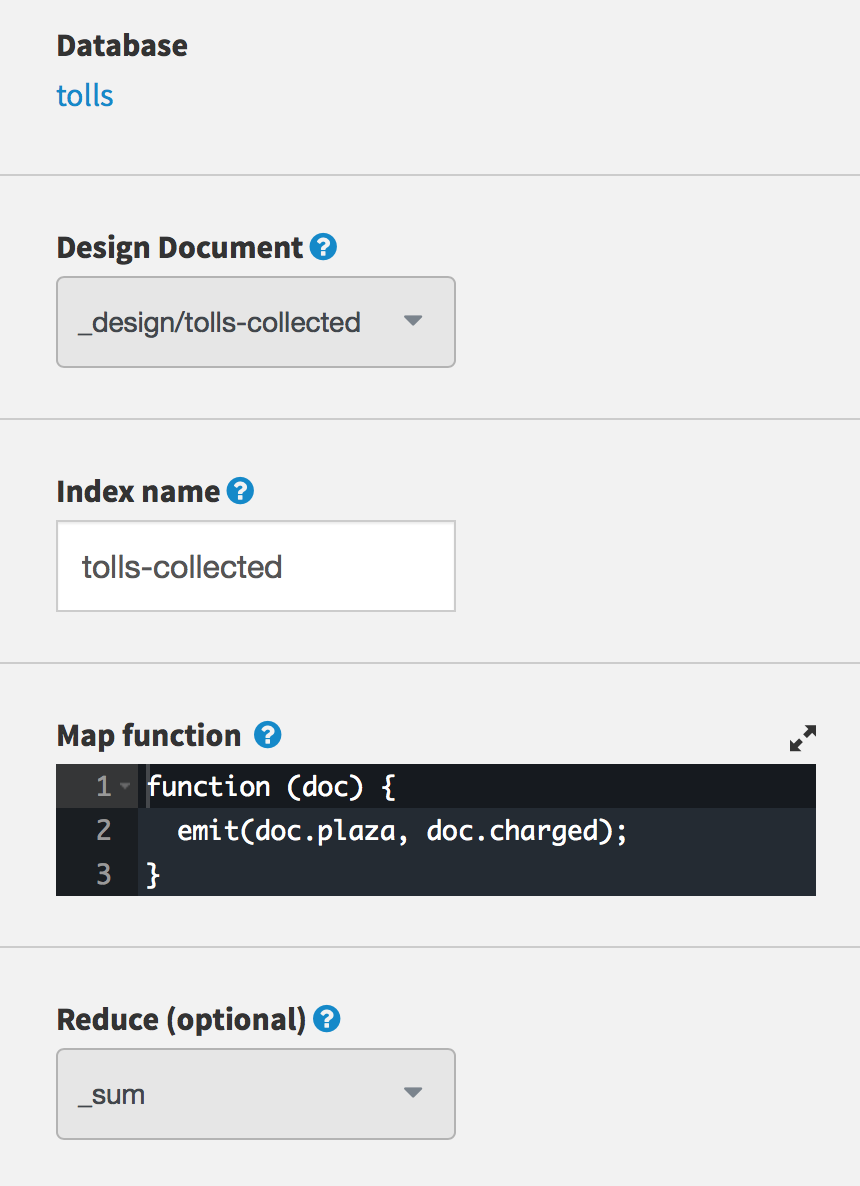
Tolls Design Document
To access our view from our Node Red application we will need to save the design document and build the index. Once we have done this we can run the query and copy the Cloudant generated RESTful API for later use in our Node Red application. Be sure to select the “reduce” option when running the query as shown in the screenshot. After the query completes copy the generated API URL and copy it into a text file for use later. You can get the generated API by clicking on the “API URL” link in the Cloudant dashboard.
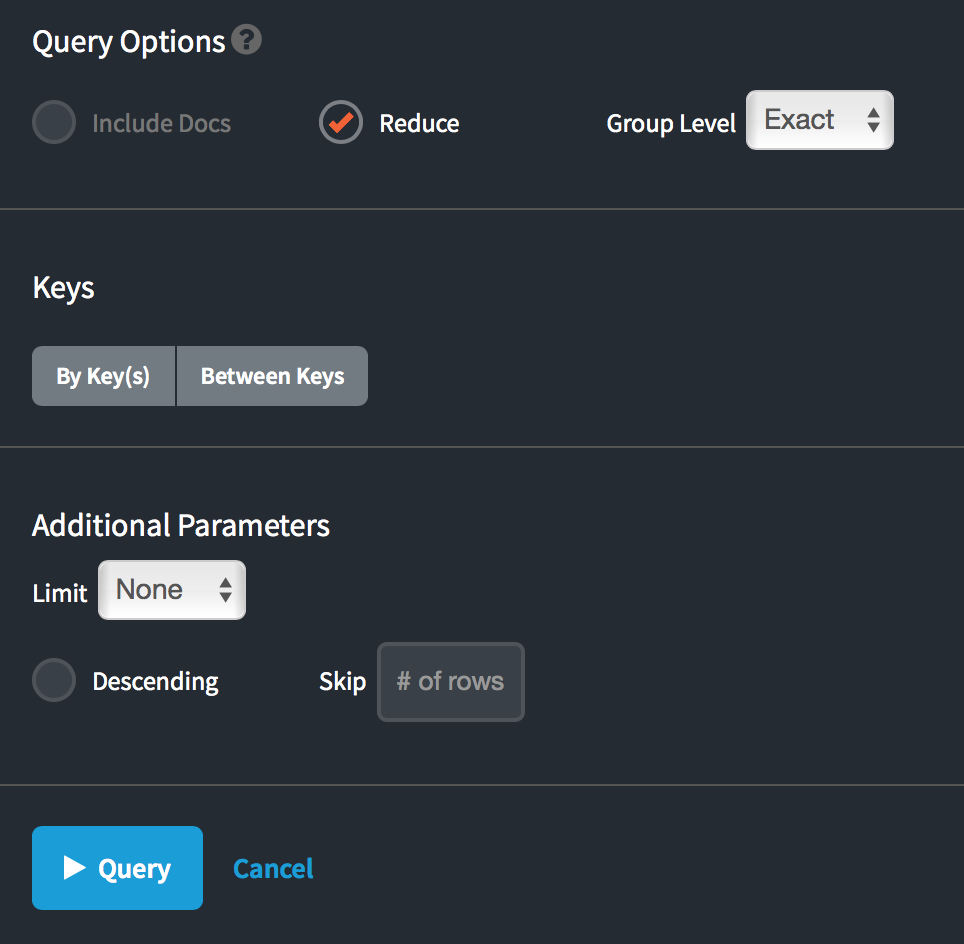
Running Cloudant Query

Generated API URL
Now that we have our Cloudant view created and have the URL for accessing our view, we will setup our Node Red API to call it. To help us create our secure API in Node Red we are going to add in a Node Red module for HTTP authentication. The Node Red HTTP Authentication module enables us to setup Basic authentication for our API. We can add the HTTP Authentication module to our Node Red instance by simply adding the module “node-red-contrib-httpauth”: “^1.0” to the package.json file and then redeploying the application on Bluemix.
After our Node Red application has been restarted open up the Node Red flow editor and add “HTTP In”, “HTTP Auth”, “HTTP Request”, and “HTTP Response” nodes to your Node Red flow and wire them together as shown in the screenshot.

Node Red Flow
Now that we have the nodes wired up together, let’s configure each one. In the “HTTP In” node we will define a route to your API. Go ahead and use the “/tolls” route and configure it for “GET” as shown in the diagram.
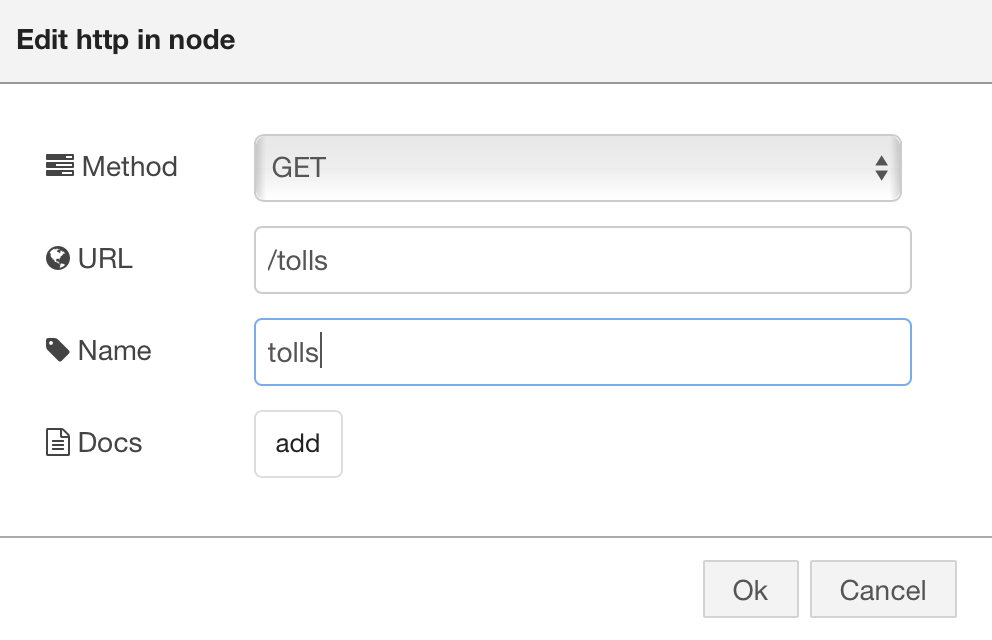
HTTP In Node
In the “HTTP Auth” node use Basic Authentication and enter a username and password of your choosing as shown in the diagram.

HTTP Auth Node
In the “HTTP Request” node we will enter the API URL to our Cloudant view that we copied into a text file earlier and the credentials to our Cloudant database instance from the Bluemix dashboard into the Username and Password fields. Here are some screenshots to show where you can find the credentials and where to put them into the “HTTP Request” Node.

Cloudant Credentials
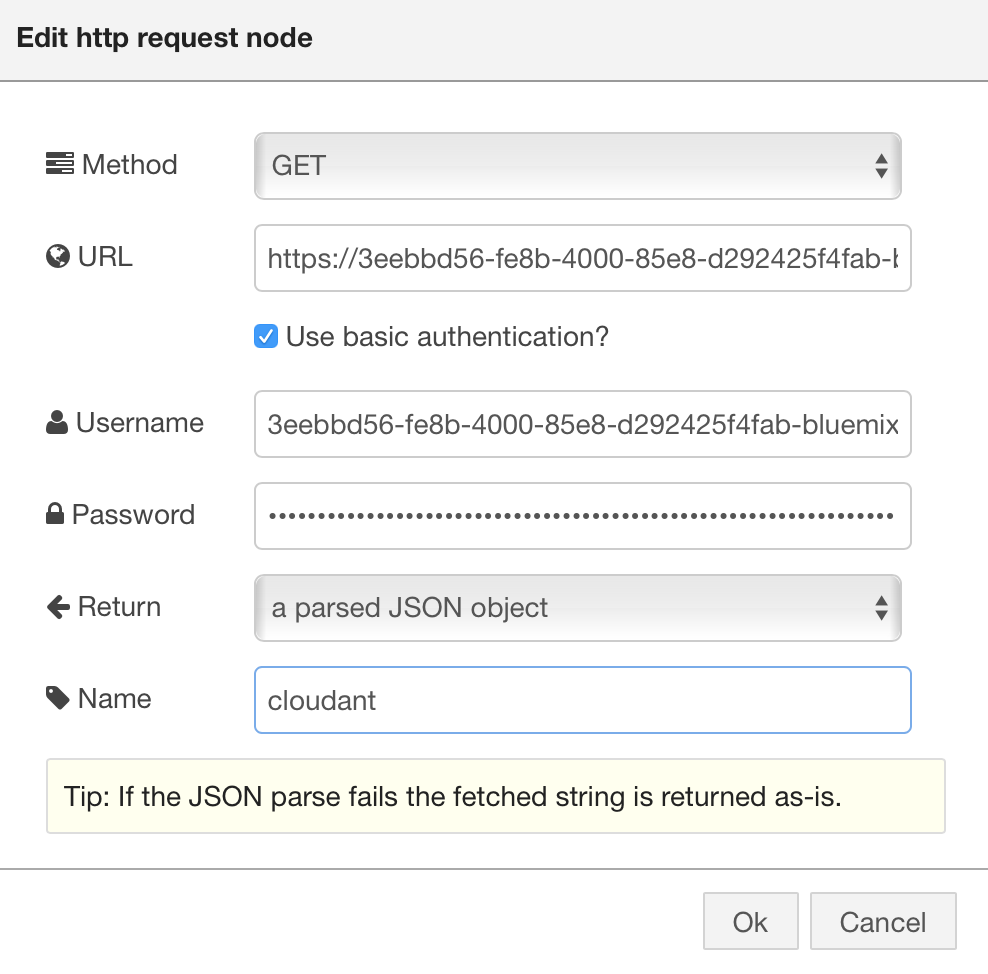
HTTP Request Node
At this point we have a fully functioning private API running in Node Red. The URL to this private API will be the Bluemix route you used when you created your Bluemix application with “/tolls” appended to it. In my case, the full route to my private API is https://atkin.mybluemix.net/tolls.
The next step to making our API generally available to users is to have API Management generate a public interface that we can publish into Bluemix organizations catalogs. To use API Management you simply need to add the API Management service to your Bluemix application.
In this blog post we won’t go though all the steps of creating an API plan and how to publish an API to a Bluemix organization. For more details on how to do that you can see my earlier blog post on building secure APIs on Bluemix. The important thing to remember about connecting your public API on IBM API Management to your private API implementation is that you need to use the “username” and “password” that you established in the “HTTP Authentication” node. You also need to use assemble rather than proxy. Here is a screen shot that shows where to input the URL to your private API on Node Red and where to put the “username” and “password”. After you do this you can follow the standard process for publishing an API and plan to Bluemix organizations from IBM API Management.
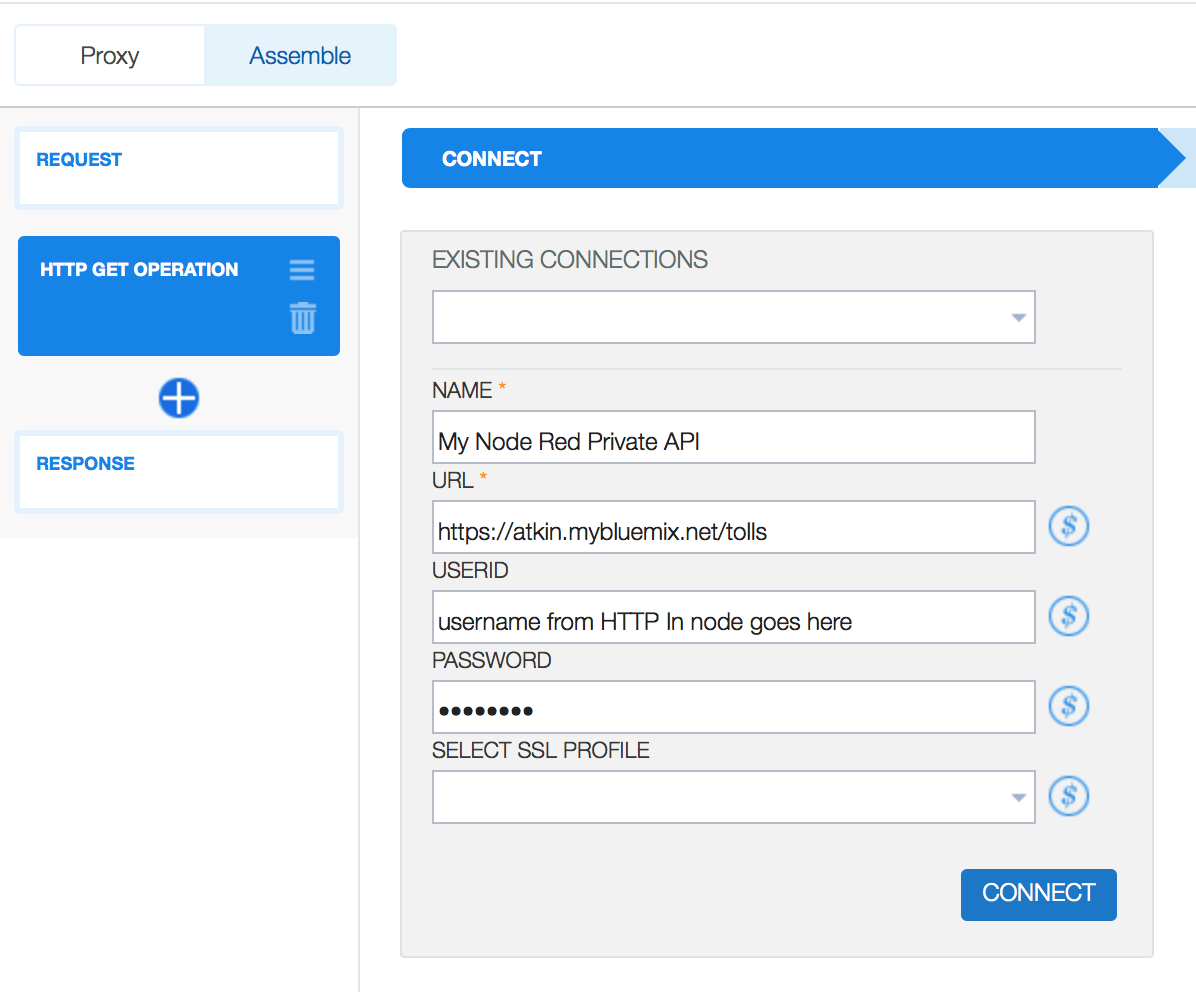
API Management
I hope this post shows you how quickly you can create a secure API that connects to a map reduce view in Cloudant with nearly no code.
Tags: API Management, Bluemix, Cloudant, Node Red

Hi, guest!

