search

Latest posts


In this post I am going to help you overcome some of the issues you might encounter when trying to output Unicode from OpenWhisk actions. In a previous post I showed how to call the Globalization Pipeline service from Node Red and in this post I will show you how to call the Globalization Pipeline service from an OpenWhisk action and properly handle Unicode text that is returned by the service in OpenWhisk. If you are already familiar with how to get the Globalization Pipeline service’s credentials then you can go ahead and grab the service instance id, username, password, and create a reader key for accessing the service. If you don’t know how to do this, then read my earlier post.

I have provided a sample OpenWhisk action JavaScript file that shows how to call the Globalization Pipeline service. Feel free to download this file and simply insert your credentials in the appropriate locations. You will notice that we don’t simply return the raw result returned by calling the Globalization Pipeline service, but rather we first URI encode the messages for each key. We need to do this, because OpenWhisk converts all output to the ISO8859-1 encoding that causes Unicode characters beyond U+007F to be incorrectly converted. To avoid this issue we convert the messages to a safe URI encoding before outputting them by calling the querystring.escape function. This means that you will need to decode the messages before using them in other JavaScript functions. To decode the messages in JavaScript you can use the decodeURI function.

To upload the OpenWhisk action from the command line use the wsk action create command.

wsk action create globalization g11n-pipeline.js

To invoke the OpenWhisk action from the command line use the wsk action invoke command and substitute the lang id and bundle name with your values.

wsk action invoke globalization –blocking –result –param lang ‘lang id’ –param bundle ‘bundle name’

I hope this post helps you with using Unicode text in OpenWhisk.


This post is going to be based upon a previous post and video that I made that shows you how to quickly build an API with IBM API Connect, Node Red, and Cloudant. In this post we are going to actually create the same API, but instead of using Node Red for our internal API implementation we will be using OpenWhisk from IBM Bluemix for our internal API implementation. OpenWhisk is IBM’s new event driven compute technology for serverless computing that hides the existence of servers from developers. Serverless computing allows you to simply provide the code you want to be executed without having to worry about creating any servers to run your code. If you would like to see short video on how to do this checkout the video on YouTube.

So let’s get started by creating two actions that will connect to Cloudant and then format the response. Here is the code for calling my map/reduce view on Cloudant and here is the code for formatting the response from Cloudant.

Let’s first create an OpenWhisk action called summary for accessing my map/reduce view on Cloudant.

wsk action create summary summary.js

Now Let’s create an OpenWhisk action called formatter that formats the response from calling our map/reduce view on Cloudant.

wsk action create formatter formatter.js

Once we have our two actions defined we can chain them together into a new action called claims so that the output of the summary action becomes the input for the formatter action.

wsk action create claims –sequence summary,formatter

Now we will create an API on API Connect that will call our OpenWhisk chained action. In API Connect all we need to do is to invoke our action by using the OpenWhisk RESTful API endpoint for our action. The endpoint for accessing your action is based on the following pattern:

https://openwhisk.ng.bluemix.net/api/v1/namespaces/{your namespace}/actions/{your action}?blocking=true

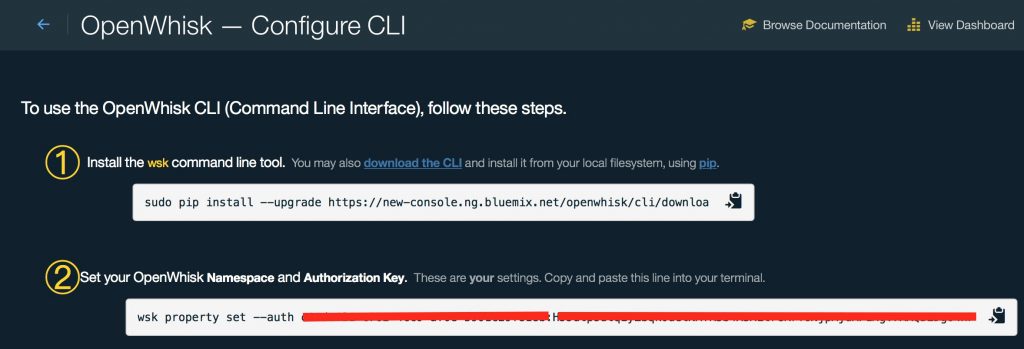
So all you need to do is to replace {your namespace} and {your action} with your specific values for your OpenWhisk installation. You will also need to obtain your OpenWhisk username and password that will be needed to call the RESTful endpoint. You can find your OpenWhisk username and password from the OpenWhisk Configure CLI page. Here is a screenshot showing where you can find that on the page.

OpenWhisk CLI Page

OpenWhisk CLI Page

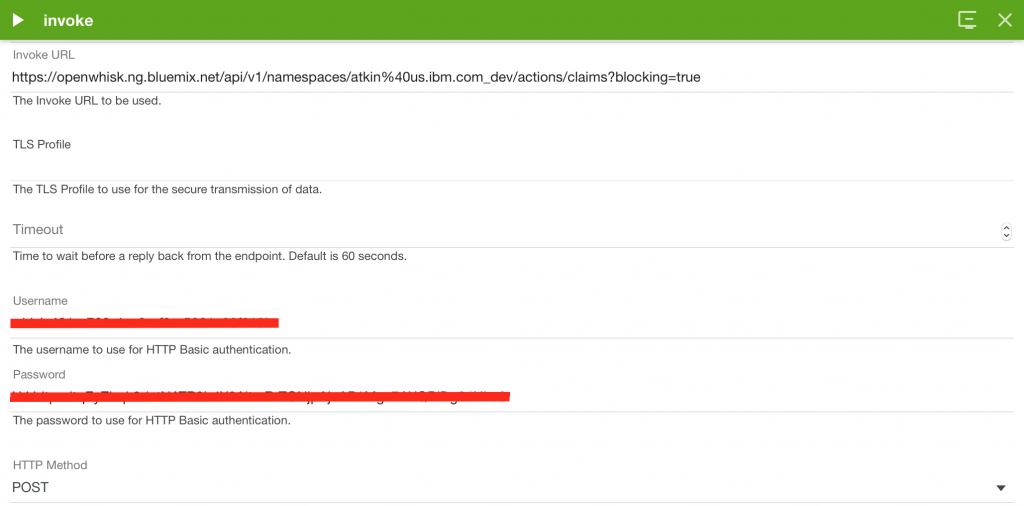
Once you have created your API on API Connect go to the assemble page and edit the invoke action to call  your OpenWhisk action sequence. Be certain to include your OpenWhisk username and password and set the HTTP method to POST. Here is a screenshot showing where to insert the values.

Invoke OpenWhisk Action Sequence

Invoke OpenWhisk Action Sequence

At this point simply publish your API to IBM Bluemix just like you would for any other API. That’s all there is to it. Now you have an API running in the cloud without having deployed any server to run your API.


In this post I am going to show you how easy it is for you to create a Bluemix tile for an API that you created using IBM API Connect. When you create APIs with IBM API Connect the credentials and urls for accessing your services are published in the developer portal that is tied to the catalog that you used to publish your APIs. Now what happens if you don’t want to embed or create special environment variables to store your credentials for your application, but instead want to use the VCAP_ENVIRONMENT variable to hold the credentials. Fortunately you can create a CloudFoundry user provided service that contains the credentials for accessing your service. This enables you to access the credentials just like you would any other Bluemix service. To do this all you need to do is to use the cf cups command. Here are the steps:

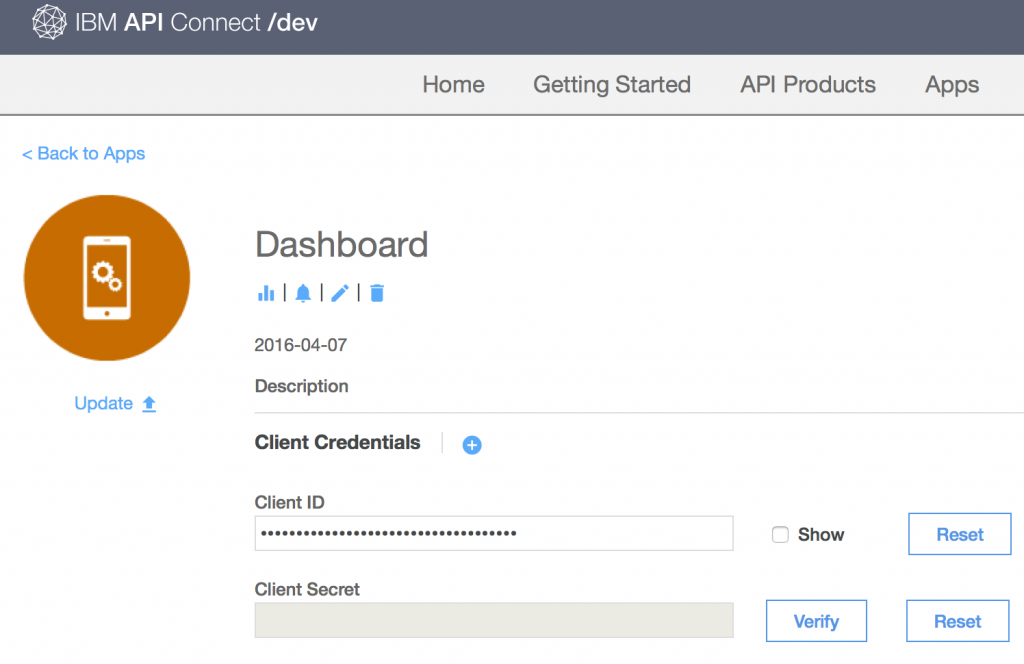
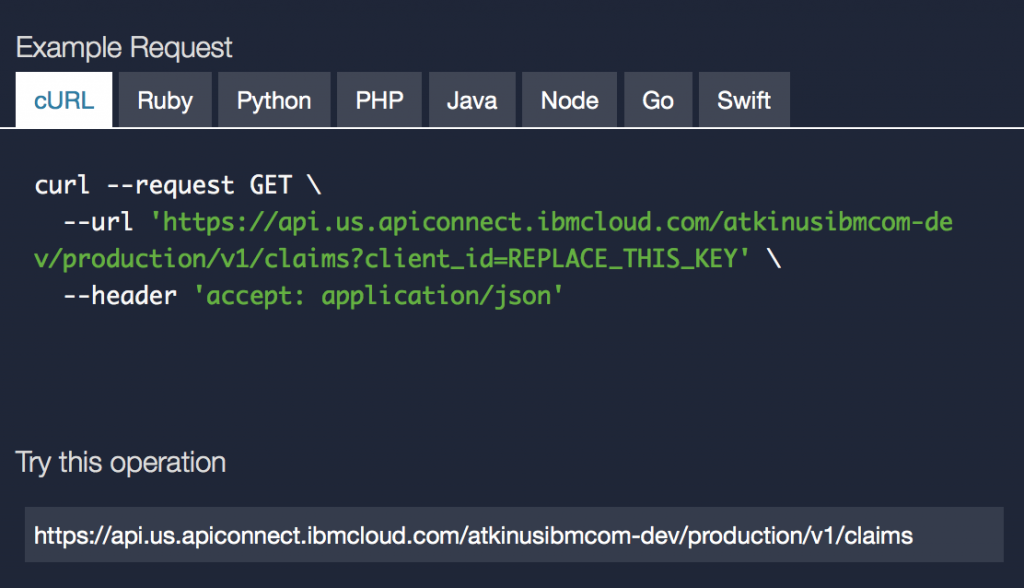
  1. Copy your API’s URL, client_id, and client_secret from the developer portal tied to your catalog. You can find this information from the “API Products” and “Apps” tabs from the developer portal as shown in these screenshots.
    Application Credentials

    Application Credentials

    API URL

    API URL

  2. Run the cf cups command from your command line and pass in the parameters as shown below where you substitute your values for: API-NAME, ID, and SECRET.

    cf cups API-NAME -p ‘{“url”: “API-URL”, “client_id”: “ID”, “client_secret”: “SECRET”}’

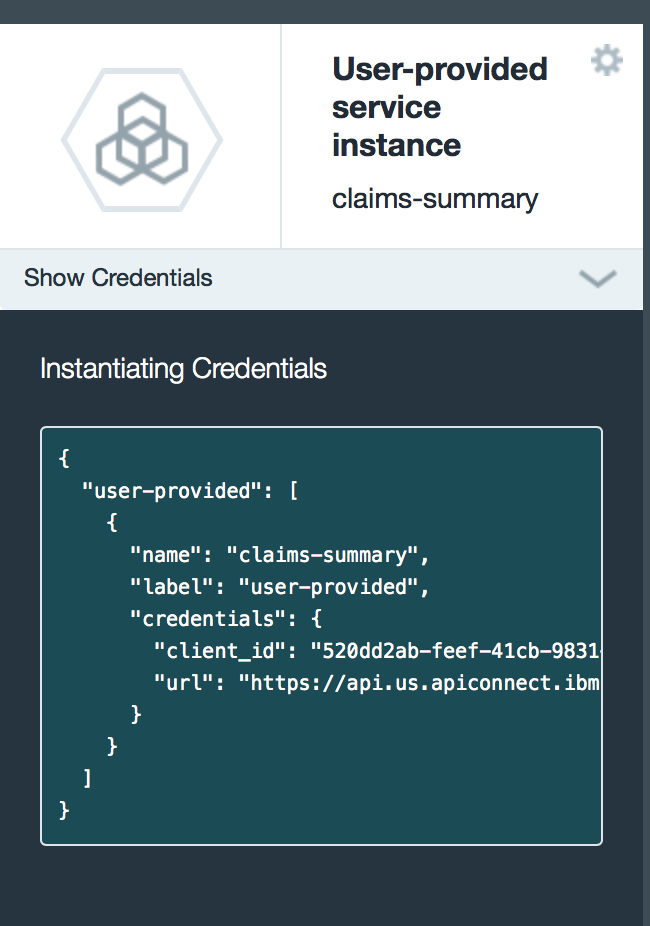
  3. From the Bluemix dashboard bind your service provided instance to any of your Bluemix applications. Once you bind the service you will be able to see the credentials from the Bluemix dashboard and your application will be able to access the credentials through the VCAP_ENVIRONMENT variable as shown below.

    User Provided API

    User Provided API

As you can see it is pretty simple to publish your API’s credentials to any application on Bluemix.


In this video I show you how to build an API using IBM API Connect where Node Red is use to create the internal implementation of the API. The Node Red flow then connects to a Cloudant database map reduce view.


This post is to help you get started with calling your OpenWhisk actions from Node Red on IBM Bluemix. I will explain how you can quickly invoke your action using OpenWhisk’s RESTful API from a Node Red flow using the HTTP Request Node. To get started you need to define your action using the wsk command line utility. For instructions on how to define wsk actions follow this link.

To get started first define your action using the wsk command line. Here is a sample action that I have written in JavaScript. This action simply looks at a customer record and then decides if they should be offered a discount and then inserts a message into the customer record. To define the action simply issue the create command:

wsk action create offer offer.js

Now that we have our action defined we need to obtain the credentials and URL to access the action as a RESTful API. To obtain this information we are going to invoke the action from the command line using the wsk utility with the -v option so that we can see all the details of what occurred when we invoked the action.

wsk -v action invoke –blocking –result –param monthsSinceLastClaim 25 –param numberOfPolicies 3 offer

Here is a screenshot of a portion of the output after we issue the command. The key elements that we will copy are the URL and the Headers.

OpenWhisk Credentials

OpenWhisk Credentials

Now we are ready to setup the call to our RESTful action from a Node Red flow. The first thing that we will do is to create a Function Node and set the url and headers parameters that we will use when we invoke the Node Red HTTP Request Node. Here is a screen shot that shows how I defined my Function Node.

Node Red Function Setup

Node Red Function Setup

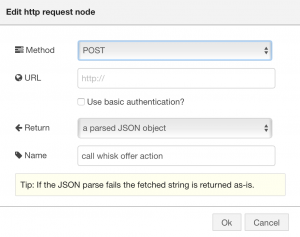
The next step is to wire the output of the Function Node to an HTTP Request Node. Here is how I configured my HTTP Request Node. Be certain to use the POST method and indicate that the return type is a parsed JSON object.

HTTP Request Node

HTTP Request Node

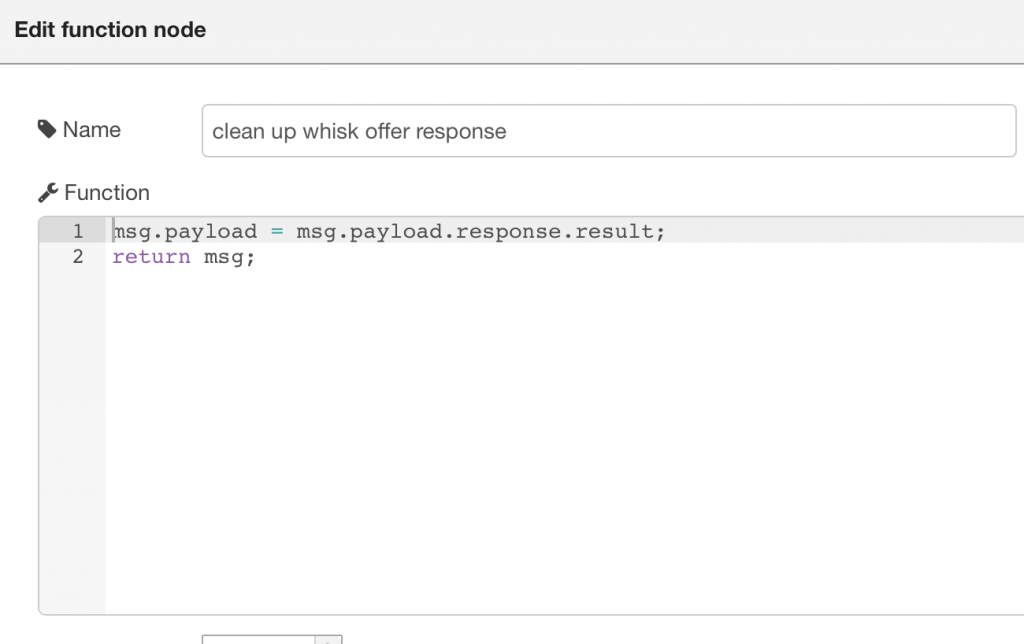
The next step is to extract the JSON result from the call to the RESTful action. You need to do this as you cannot indicate that you only want to have the result returned when calling an OpenWhisk action from the RESTful API. All you need to do is to create a Function Node to extract the result. Here is a screenshot of my Function Node.

Extract OpenWhisk Result

Extract OpenWhisk Result

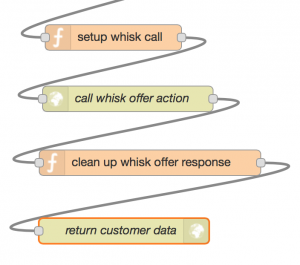
The last step is to simply wire up your Node Red flow. Here is how I wired up my flow.

OpenWhisk Node Red Flow

OpenWhisk Node Red Flow

I hope this post has helped you get started with calling OpenWhisk actions from Node Red.


In this blog post I am going to address a very common question about Bluemix services. Quite frequently I am asked if you can use Bluemix services from either an on-premise application hosting environment or from another cloud without actually hosting the application on Bluemix. The answer is yes and I will show you how to quickly do this in Bluemix. As an example I will show you how to create an instance of the Globalization Pipeline service on Bluemix that you can access from any application hosting environment.

The first step is to select the service from the Bluemix catalog and click on “View More”. In this screenshot we are selecting the Globalization Pipeline service.

Bluemix Service Catalog

Bluemix Service Catalog

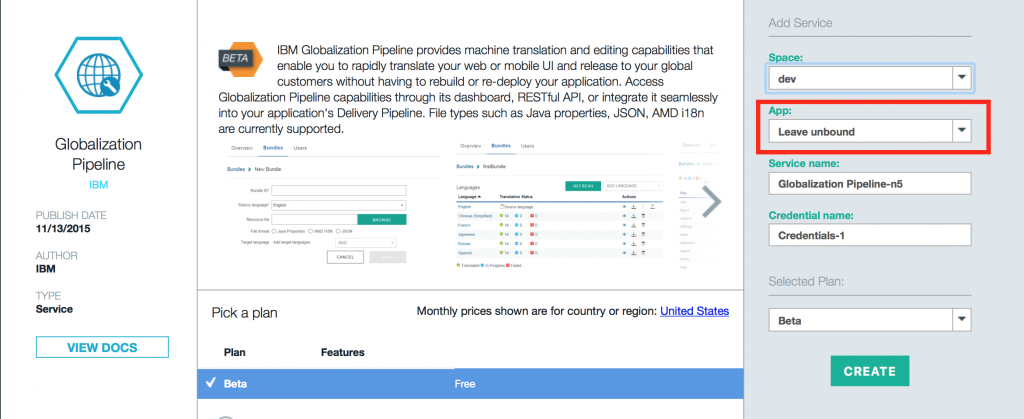
Once you click “View More” you will be presented with a page to create and bind an instance of the service. To create an unbound instance of the service simply select “Leave unbound” from the App pulldown and then click “Create”.

Unbound Service

Unbound Service

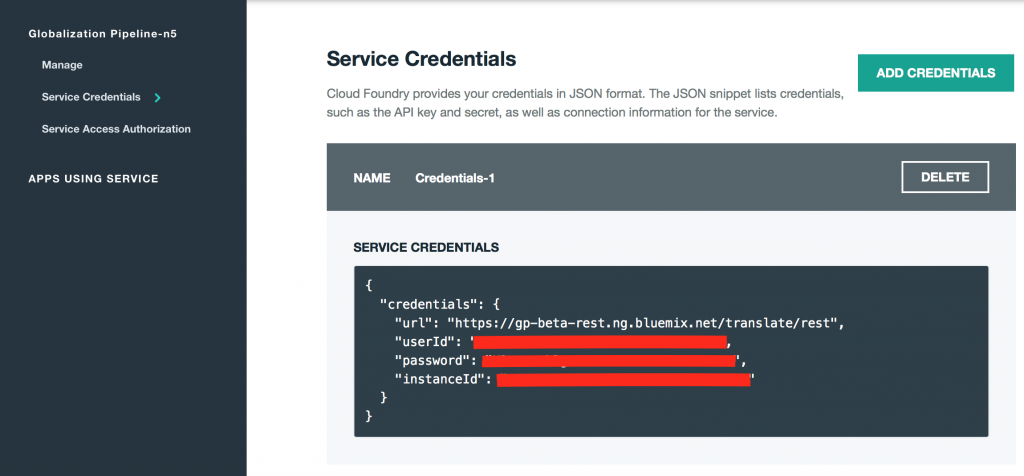
After the service is created you will be taken to the service’s dashboard. From the dashboard view you will see a link to the “Service Credentials” from the left navigation. Go ahead and click this link to see the credentials. Now that you have the credentials and service’s URL you can access the service from your application in any hosting environment.

Unbound Service Credentials

Unbound Service Credentials

That’s it as you can see it is pretty simple to use Bluemix services from any hosting environment.


Here is a short video that talks about the IBM Globalization Pipeline service on IBM Bluemix. In this video we show how to use the Globalization Pipeline service’s dashboard to quickly translate an application running in IBM Bluemix.


In this blog post I am going to show how to quickly translate a WebSphere Liberty application on Bluemix using the Globalization Pipeline service from within the IBM DevOps Services Delivery Pipeline. The best part about doing this is that the whole task of translating your Java property files will be completely automated for you. The only thing that you will need to do is simply specify that you want your property files translated from IBM DevOps Services Delivery Pipeline.

If you need more information on IBM DevOps and Delivery Pipeline, then check out these tutorials Intro to IBM DevOps Services. The aim of this post is to show how you can use the Globalization Pipeline service job type from IBM DevOps Services to rapidly translate your content through Globalization Pipeline.

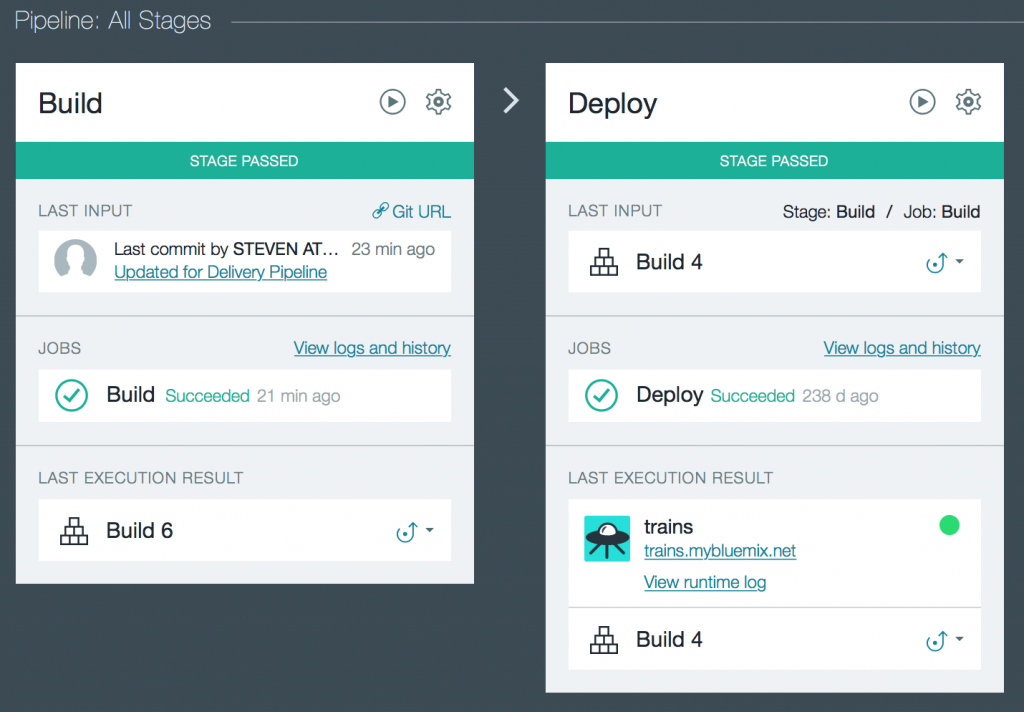
To get started make sure you have configured your Bluemix Java WebSphere Liberty application to be built in IBM DevOps Services. In our example we are using Maven to build our application and then having IBM DevOps Services automatically deploy the application to Bluemix. Here is a screenshot that shows a typical type of build and deploy configuration for Liberty applications in IBM DevOps Services.

IBM DevOps Liberty Build and Deploy

IBM DevOps Build and Deploy

In order for us to use the Globalization Pipeline service from IBM DevOps services we need to make sure that we have properly named our Java property file that contains the strings that we want to translate. To ensure that your file will be automatically detected by IBM DevOps Services the base file name must contain the “_en” language code. In our example the name of our property file is trains_en.properties.  To automatically have this file translated for you do the following:

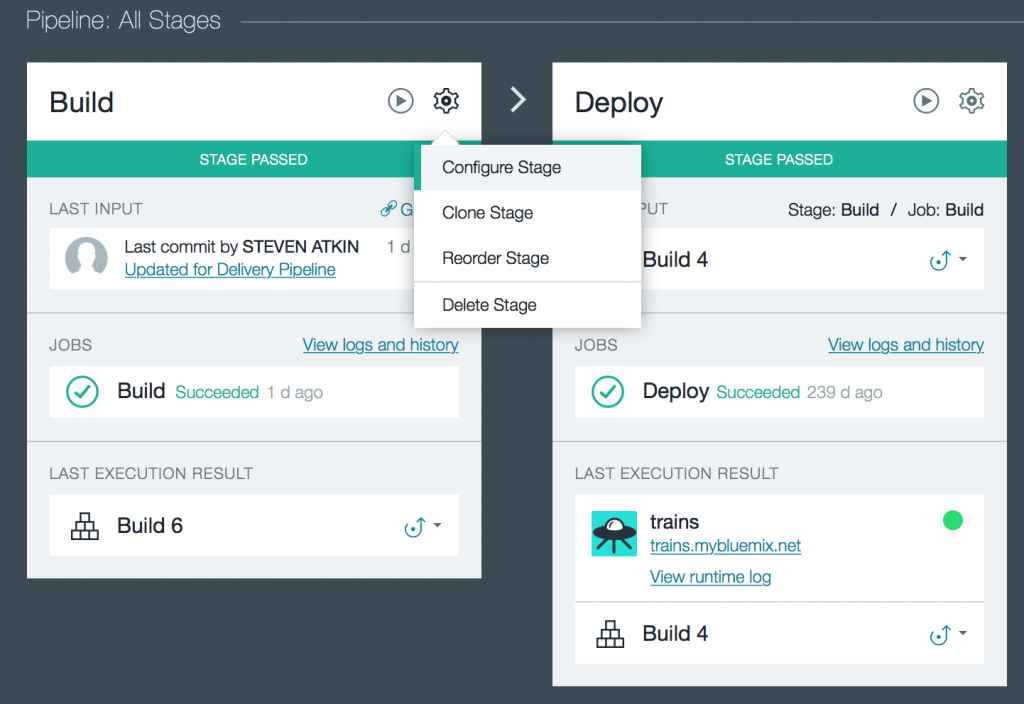
  1. Click on Configure Stage from your Build stage.
    Configure Stage

    Configure Stage


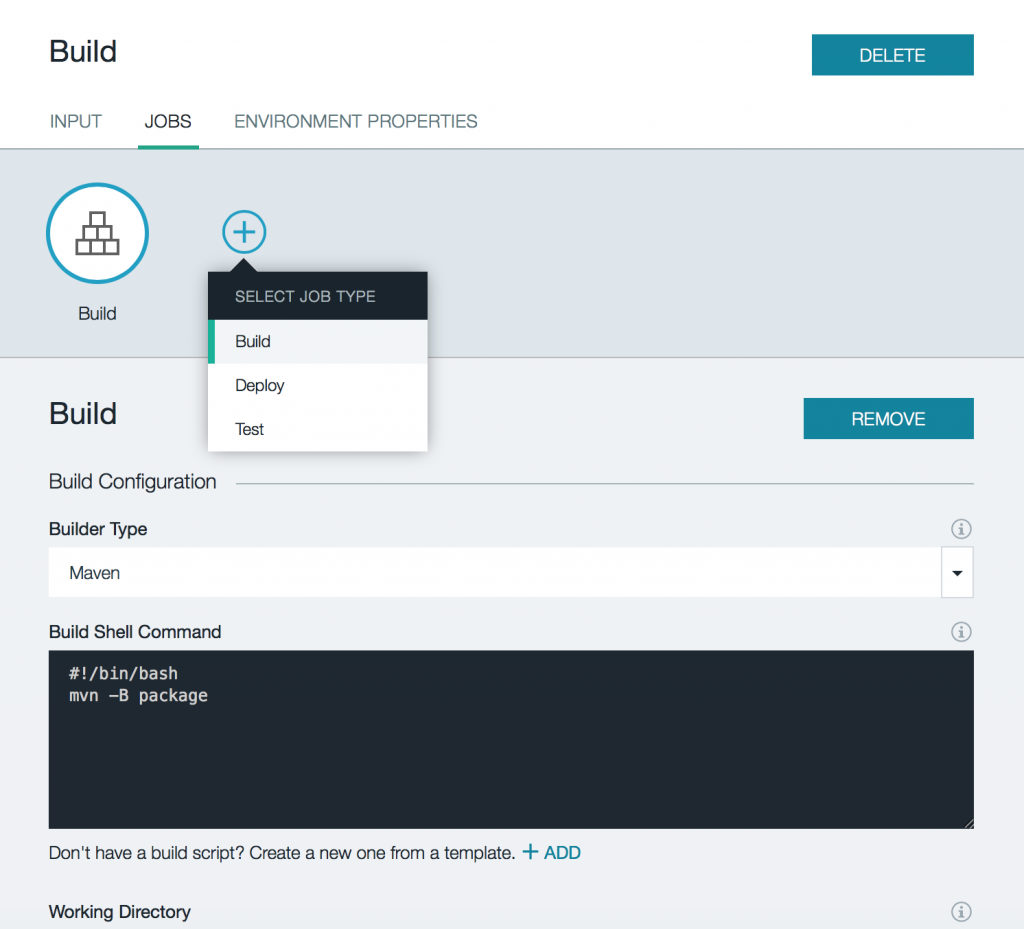
  2. Add a new Build job type.
    Build Job Type

    Build Job Type


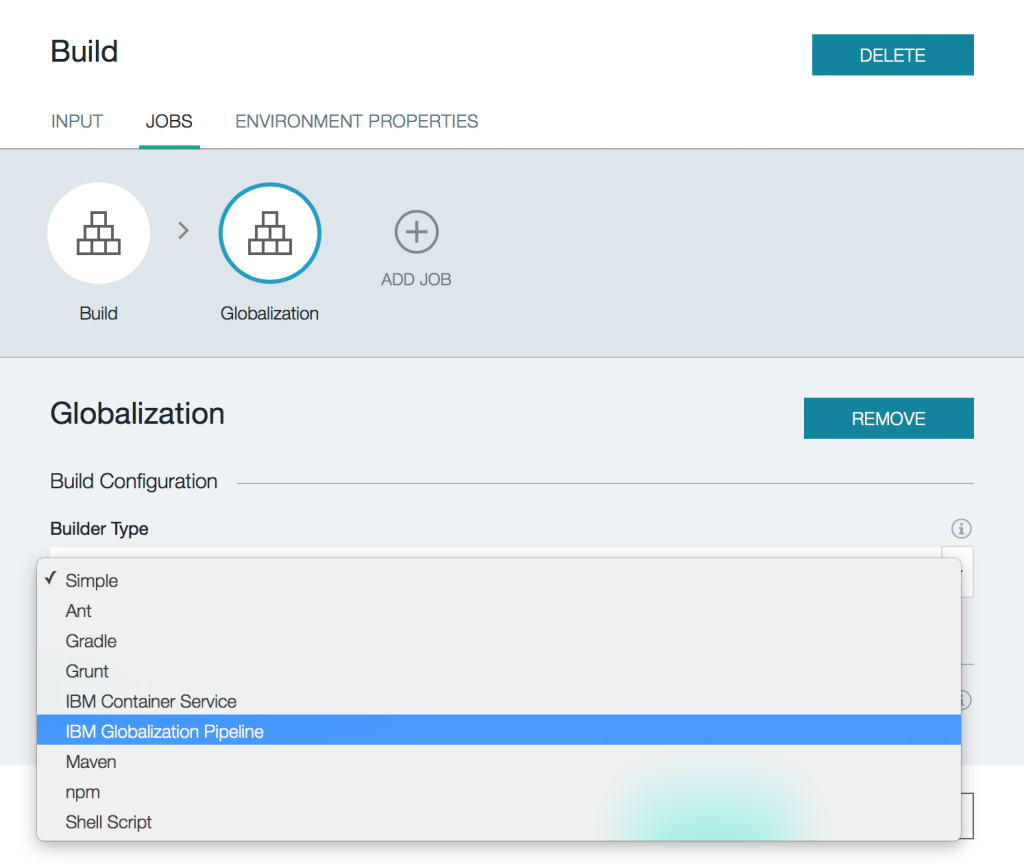
  3. Select IBM Globalization Pipeline for the builder and name it Globalization.
    Globalization Builder

    Globalization Builder


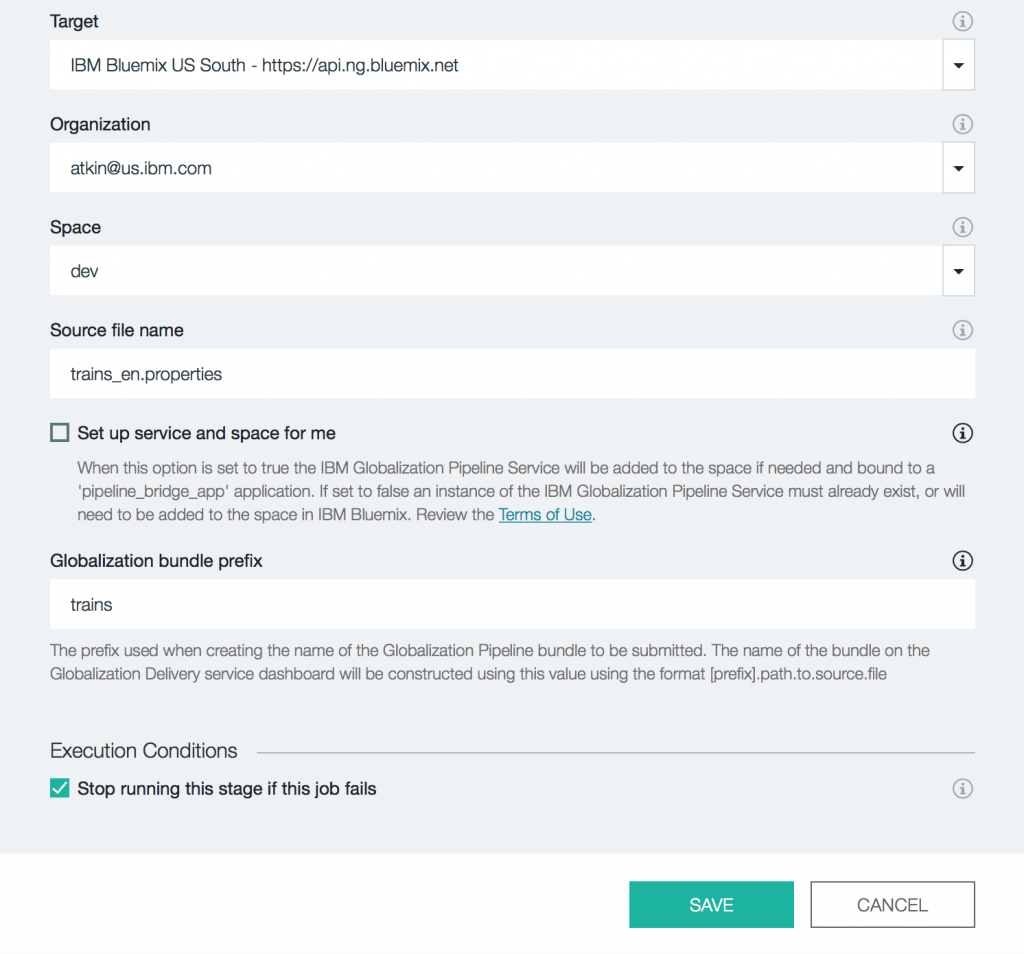
  4. Fill in the name of your property file and select a name for the bundle. You also need to indicate whether or not you would like to have an instance of the Globalization Pipeline service created for you. If you already have an existing instance of the service in your Bluemix org and space, then you don’t need to create another. If you don’t have an instance already created, then indicate that you would like to have one created for you. In this example, the name of my property file is trains_en.properties and the bundle name I am using is trains. I also already have an instance of the Globalization Pipeline service in my org and space so I don’t need to create another one.
    Globalization Pipeline Settings

    Globalization Pipeline Settings


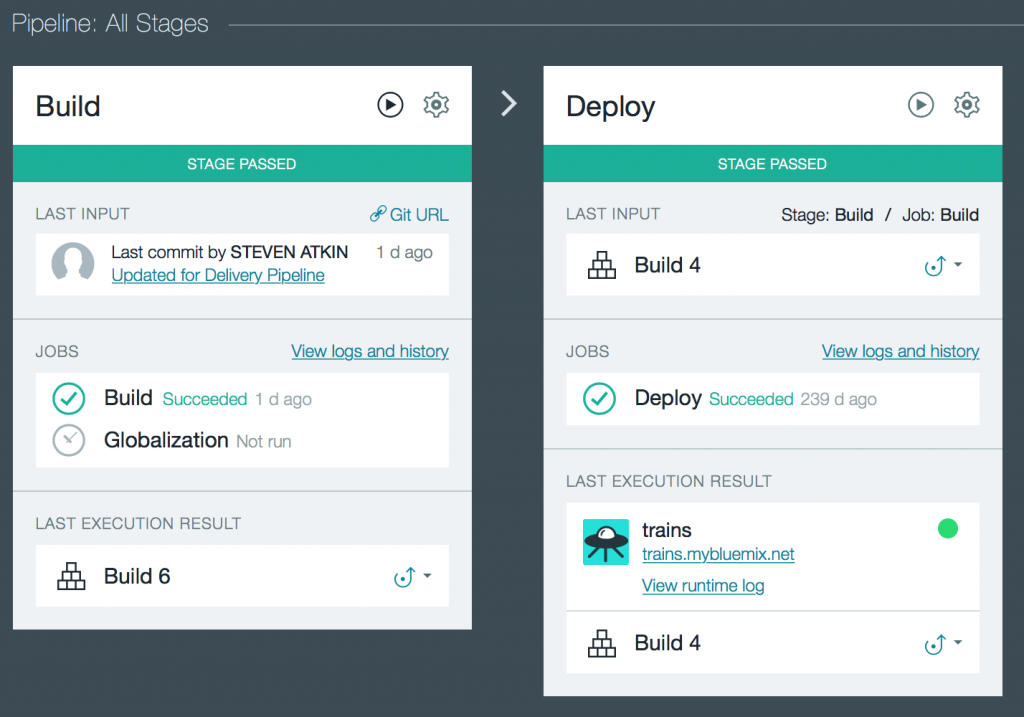
  5. Return to your Build stage and now run it.
    Run Build Stage

    Run Build Stage


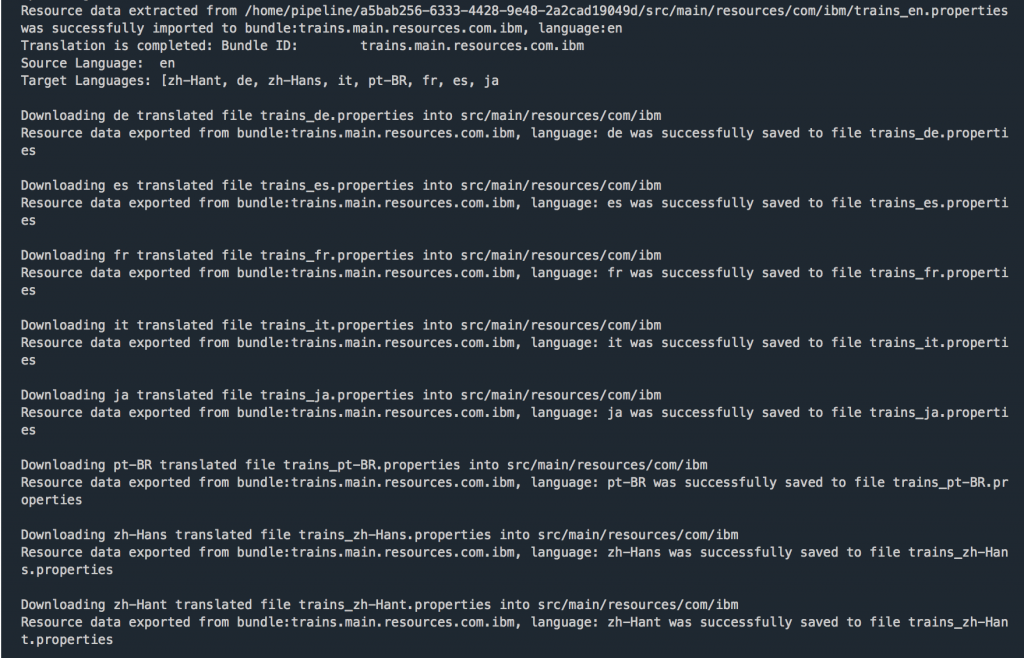
  6. Check the log files and verify that your file was translated.

    Translation Log

    Translation Log

At this point you have successfully translated your Java property file and automatically assembled the translated versions into your build so now you are ready to have users come and checkout your application in other languages. You can also invite language experts to check the translations for consistency and grant them access to your translations in the Globalization Pipeline so they can make edits for you. I hope this post has helped you get going with using the Globalization Pipeline service from IBM DevOps Services.


In this post I will show you how to quickly globalize an API in Node Red that needs to return messages in more than one language. This is really easy to do when you use the Globalization Pipeline Service on IBM Bluemix.

In our example we are going to create an API that returns a message that indicates the current status of a connected device. To make this easy we will just have some code randomly select whether the device is connected or disconnected. The API will then return a message that says “The device is connected” or “The device is not connected” depending upon the current status of the device. If you would like to see the URL in action you can click on this link for the message in English or this link for French. The URL format that we will use will be http://atkinred.mybluemix.net/device/status?lang={ISO language code}.

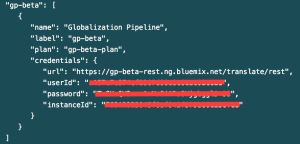
To get started, go ahead and bind an instance of the Globalization Pipeline service to your Node Red application and be sure to copy off the service instance id and URL for the Globalization Pipeline service from the VCAP environment variable. We will use these values later when we call the Globalization Pipeline service API.

Globalization Pipeline Service Instance ID

Globalization Pipeline Service Instance ID

The first thing that we need to do is to create a message file that contains our two messages. We will create the messages using a simple JSON syntax. Here is a screenshot that contains the two messages in a file I created called messages.json.

JSON Message File

JSON Message File

Now that we have our messages.json file created we will need to upload it to the Globalization Pipeline service by using the service’s dashboard. To upload the file all you need to do is the following:

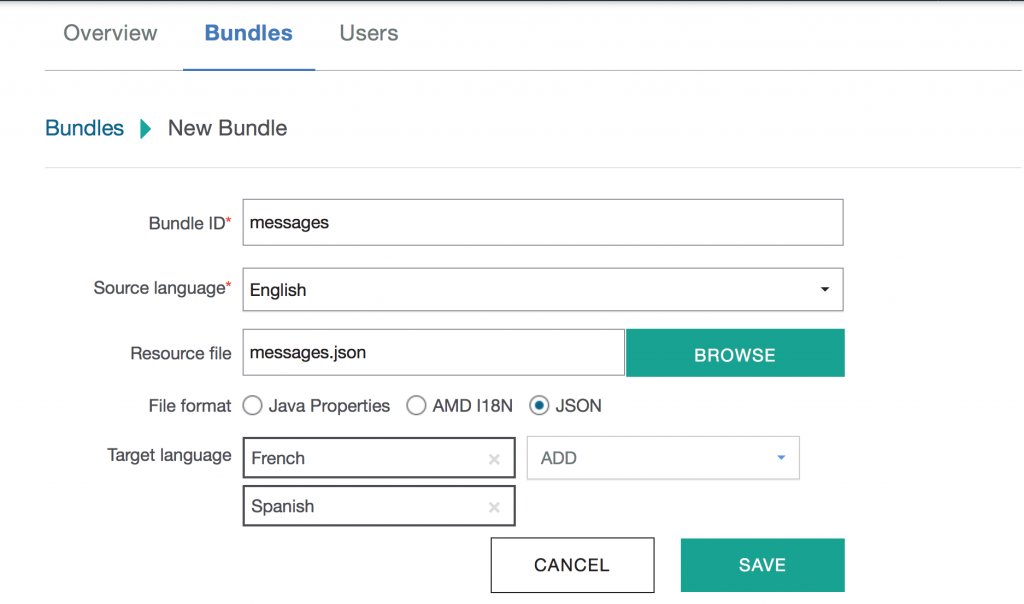
  1. Create a resource bundle in the dashboard and name it messages.
  2. Upload the messages.json file.
  3. Select the languages that you want to translate the file into. In my example I used Spanish and French.
  4. Click Save to start the upload and translation process.
Uploading Messages

Uploading Messages

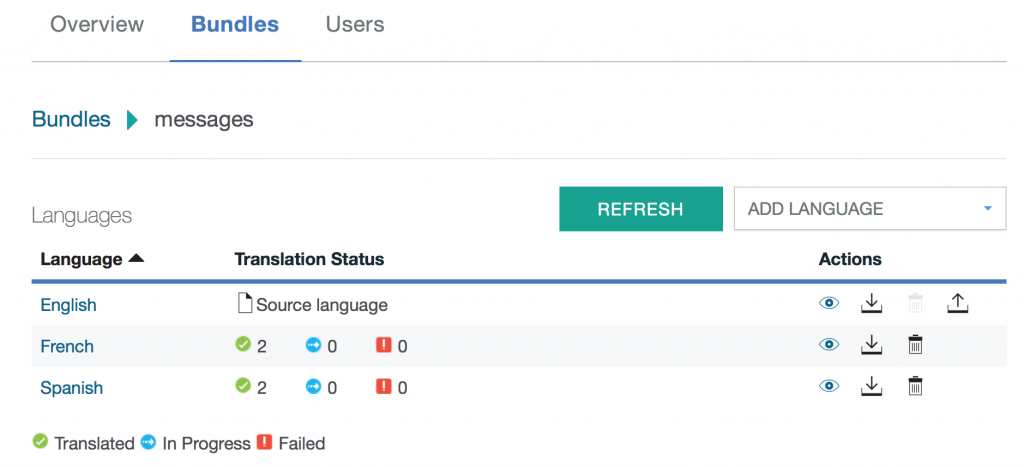
To verify that you uploaded the file correctly and that the contents were translated check the status of the messages bundle. Your screen should look something like this.

Messages Bundle Status

Messages Bundle Status

Now that we have our messages translated we need to enable access to this bundle in the Globalization Pipeline service dashboard. The Globalization Pipeline allows you to create a special read-only API key that you can safely use from client applications. With this special API key you are able to download the translated messages, but are unable to delete or change the messages. To create the read-only API key yo u need to do the following:

  1. Select the Users tab in the Globalization Pipeline service dashboard.

    Globalization Pipeline Users

    Globalization Pipeline Users

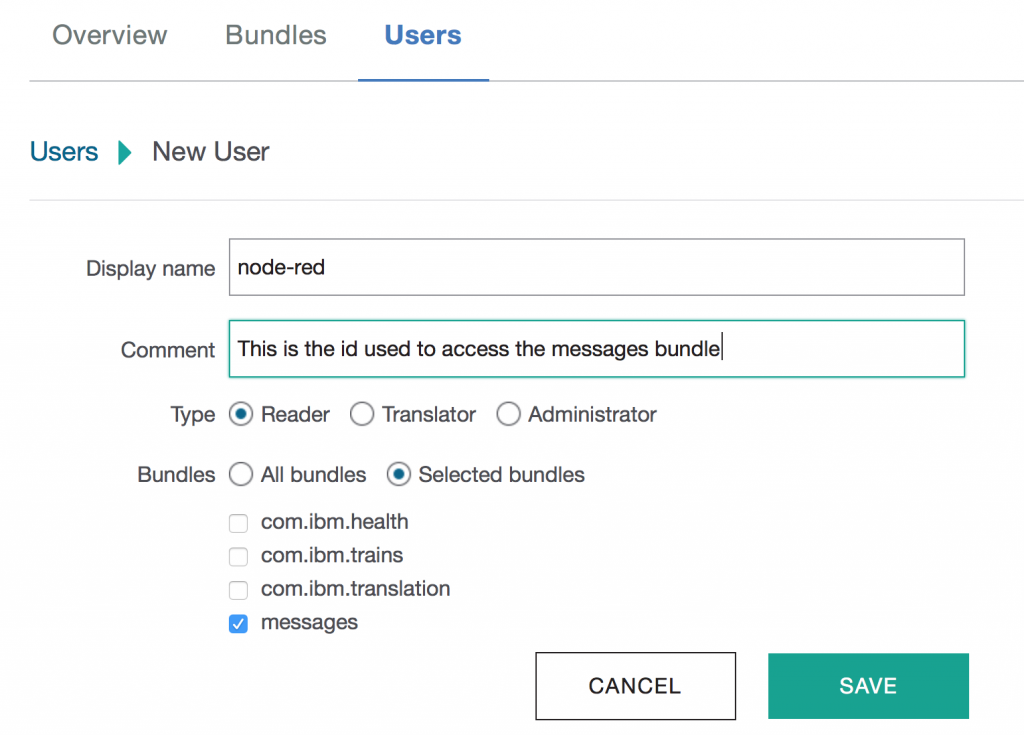
  2. Click New User
  3. For the Display name use any name you like. In my example I used node-red.
  4. Enter anything you like for the Comment.
  5. Select Reader for the Type.
  6. Select your specific bundle or all bundles. In my example I selected only the messages bundle.

    Creating New Globalization Pipeline User

    Creating New Globalization Pipeline User

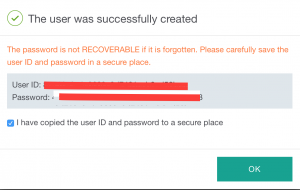
  7. Click Save. Once you click Save a pop-up will be displayed that shows the User ID and Password that you will use to access your messages. Copy off these values as they will not be displayed again. If you forget to do this you will need to delete this user and create a new one.

    Reader Credentials

    Reader Credentials

Now that we have our credentials established we can call the RESTful Globalization Pipeline API from our Node Red application. To retrieve the messages from the Globalization Pipeline service we will use the GET bundle by language ID API. Here is a link to the API documentation.

To wire this all together we will create a Node Red flow that accepts an HTTP GET request to obtain the status and returns the appropriate language response via an HTTP Response. Here are the steps to create the Node Red flow:

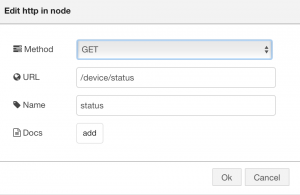
  1. Add an HTTP In node and name it status with a URL of /device/status.
    HTTP In Status Node

    HTTP In Status Node


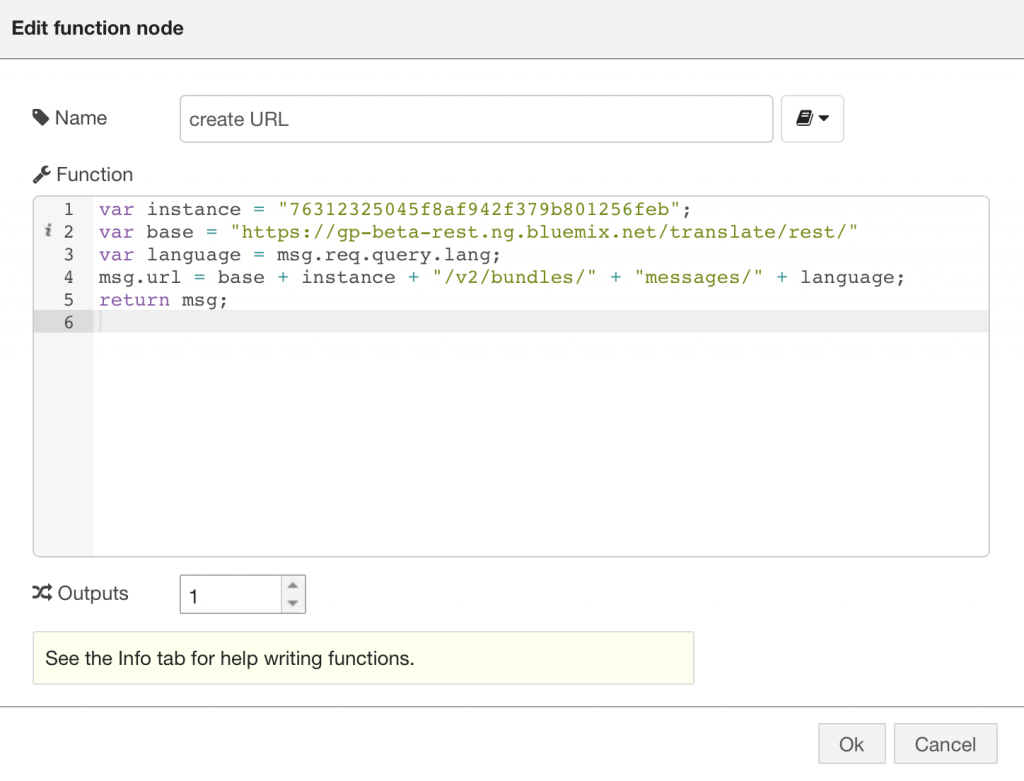
  2. Add a function node called create URL to construct the URL for accessing the Globalization Pipeline service. Be sure to use your service instance id and base path for the Globalization Service.
    Create URL Function Node

    Create URL Function Node


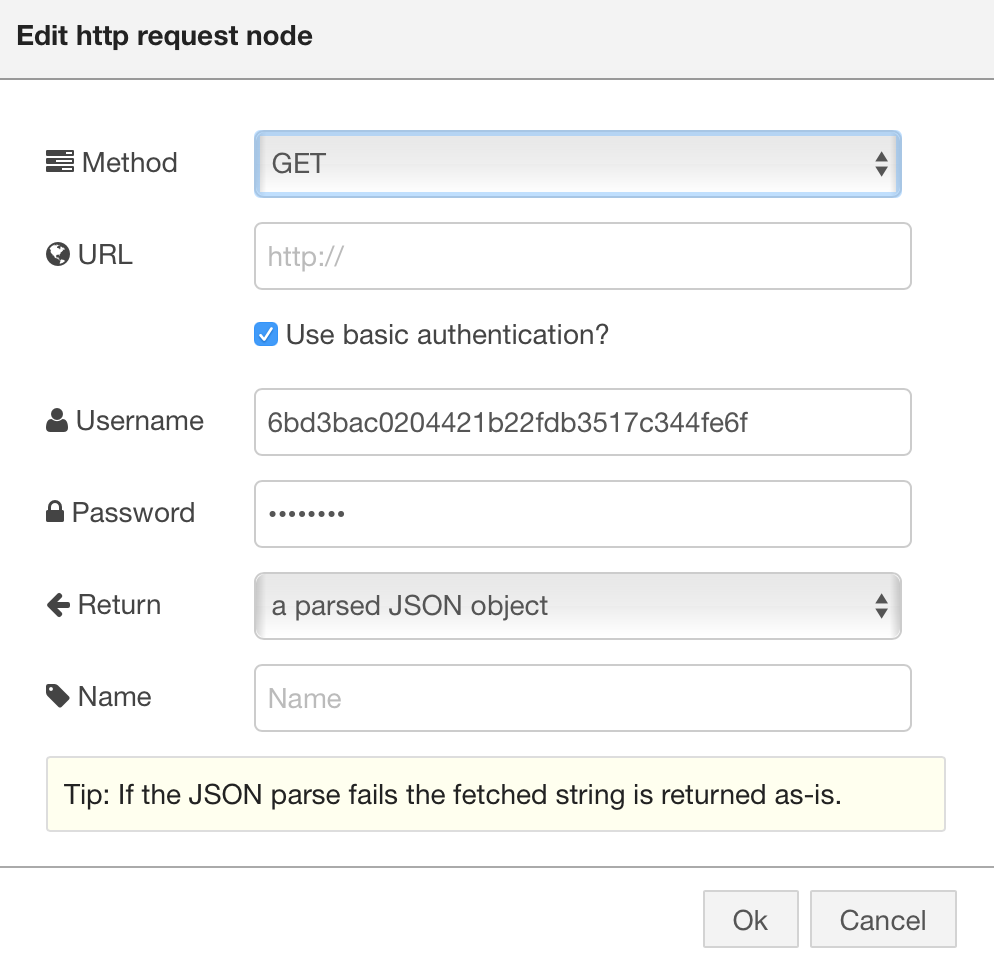
  3. Add an HTTP Request node to call the Globalization Pipeline service. Be sure to use the correct User ID and Password that you saved earlier when you added a user to the Globalization Pipeline service. You don’t need to fill in the URL as we did this programmatically in the function node.

    HTTP Request Node

    HTTP Request Node

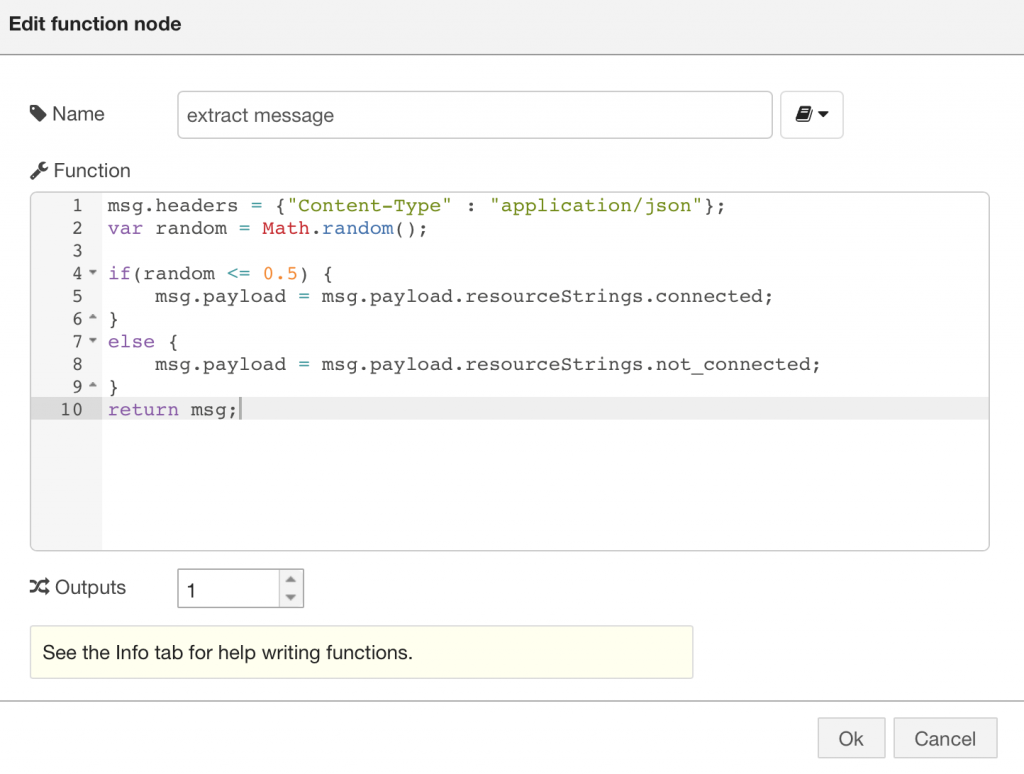
  4. Add a function node called extract message to retrieve the correct message from calling the Globalization Pipeline service.
    Extract Message

    Extract Message


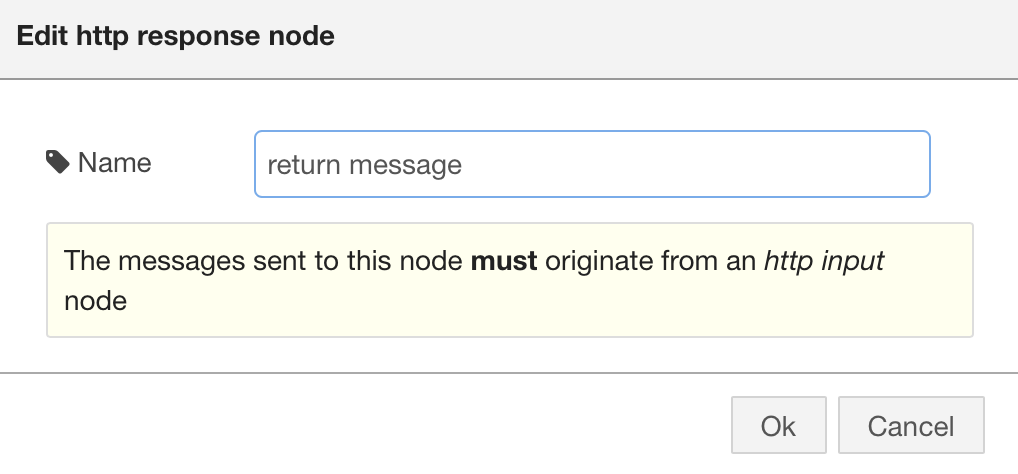
  5. Add an HTTP Response node to return the message.
    HTTP Response Node

    HTTP Response Node


  6. Wire up all the nodes as shown below and deploy your Node Red flow.

    Wired Node Red Flow

    Wired Node Red Flow

Now you have an API that will return an error message in the language of your choice. I hope this post helps you get going with creating globalized APIs in Node Red with the Globalization Pipeline service.


This blog post is to show you how quickly you can build a secure API on IBM Bluemix using Node Red and IBM API Management that lets you connect to a Cloudant database to access a view. The great part about this is that we are going to do this with almost no code. What we are going to do is create a secure API that will run a map reduce view of a Cloudant database that contains some made up toll booth data. In this scenario our database contains entries for cars paying tolls and we want to build an API that returns the total tolls collected at each toll plaza.

To get started create a Bluemix application using the Node Red Starter on Bluemix. Once you have your Node Red Starter running on Bluemix we are going to go ahead and create a Cloudant database to hold our toll both data and for us to construct a view. The database that we are going to create will contain some sample automobile toll booth data. From the Bluemix dashboard open up the Cloudant service that was bound to your application and open the dashboard and create a new database called tolls. Here is the backed up copy of my tolls database that you can use to restore into your Cloudant toll database. Here is a pointer to a Cloudant backup and restore utility you can use to help you restore the database entries from my copy of the database into your Cloudant database.  Be certain to not delete the “nodered” database in your Cloudant instance as this database contains your Node Red flows.

Now we will create a view in our tolls Cloudant database. To do this you need to create a design document and construct a map function that collects all the tolls for each plaza and a reduce function to add up all the tolls collected for each plaza. To create the design document open the database in the Cloudant dashboard and from “All Documents” select “New View”. Here is a screenshot showing you how to do this.
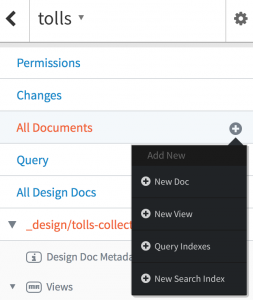
Creating a Design Document

Creating a Design Document

Here is a screenshot that shows the map and the reduce functions for the tolls database. In this example the name of the design document and index is “tolls-collected”, but you are free to name the design document and view as you wish.
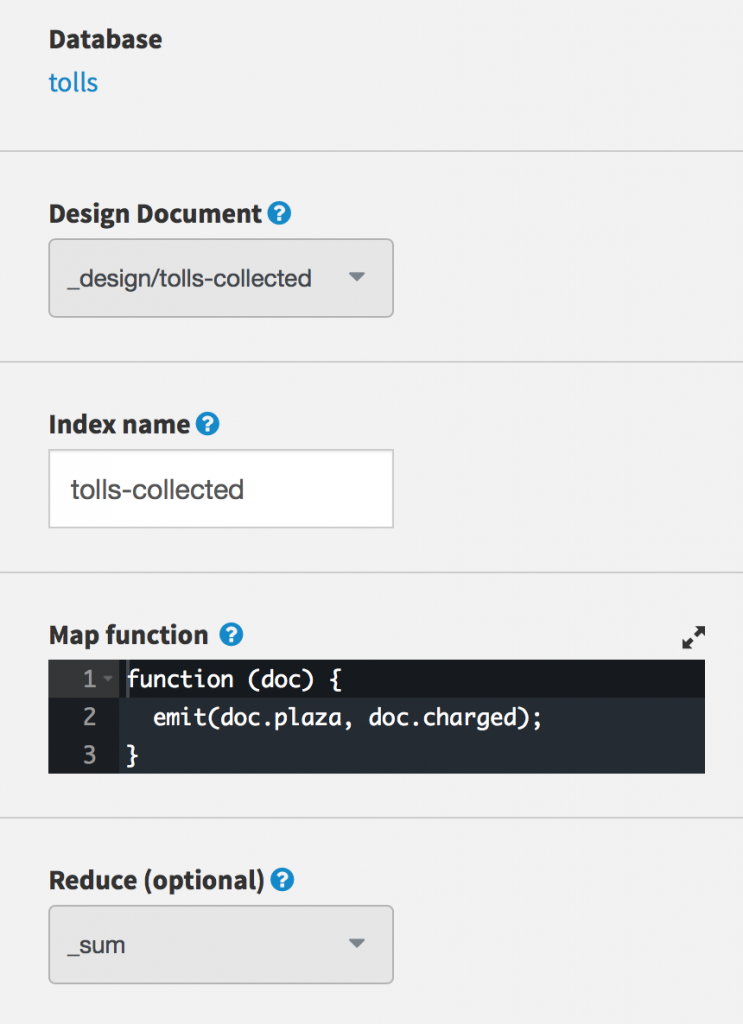
Tolls Design Document

Tolls Design Document

To access our view from our Node Red application we will need to save the design document and build the index. Once we have done this we can run the query and copy the Cloudant generated RESTful API for later use in our Node Red application. Be sure to select the “reduce” option when running the query as shown in the screenshot. After the query completes copy the generated API URL and copy it into a text file for use later. You can get the generated API by clicking on the “API URL” link in the Cloudant dashboard.
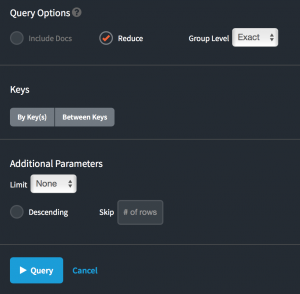
Running Cloudant Query
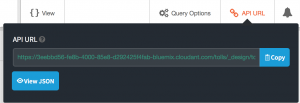
Running Cloudant Query

Generated API URL

Generated API URL

Now that we have our Cloudant view created and have the URL for accessing our view, we will setup our Node Red API to call it. To help us create our secure API in Node Red we are going to add in a Node Red module for HTTP authentication. The Node Red HTTP Authentication module enables us to setup Basic authentication for our API. We can add the HTTP Authentication module to our Node Red instance by simply adding the module “node-red-contrib-httpauth”: “^1.0” to the package.json file and then redeploying the application on Bluemix.

After our Node Red application has been restarted open up the Node Red flow editor and add “HTTP In”, “HTTP Auth”, “HTTP Request”, and “HTTP Response” nodes to your Node Red flow and wire them together as shown in the screenshot.

Node Red Flow

Node Red Flow

Now that we have the nodes wired up together, let’s configure each one. In the “HTTP In” node we will define a route to your API. Go ahead and use the “/tolls” route and configure it for “GET” as shown in the diagram.
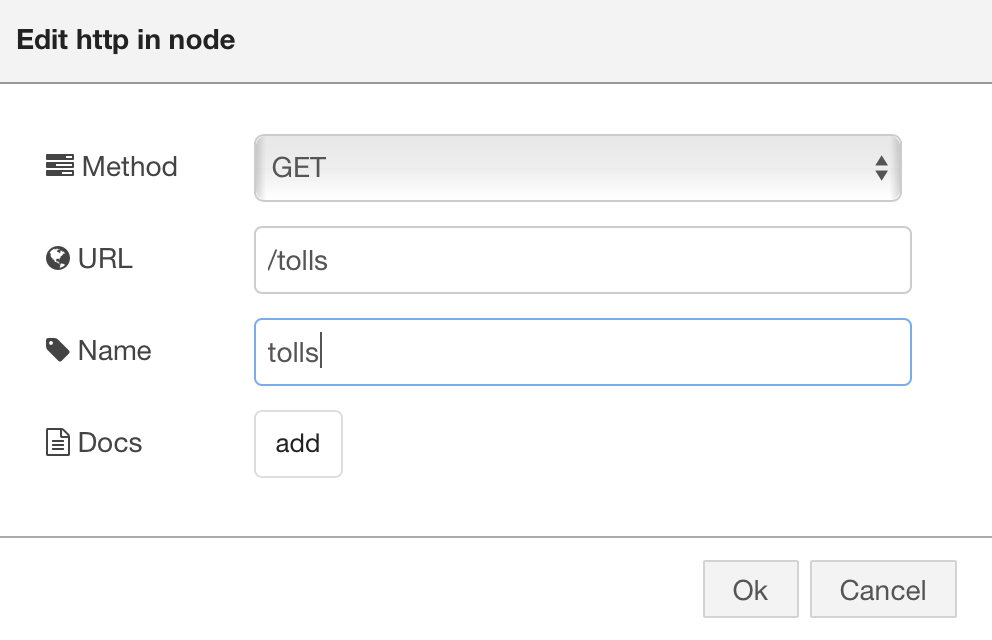
HTTP In Node

HTTP In Node

In the “HTTP Auth” node use Basic Authentication and enter a username and password of your choosing as shown in the diagram.
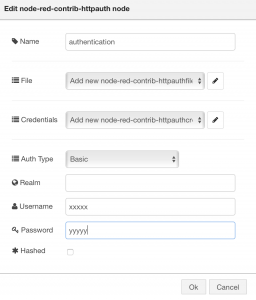
HTTP Auth Node

HTTP Auth Node

In the “HTTP Request” node we will enter the API URL to our Cloudant view that we copied into a text file earlier and the credentials to our Cloudant database instance from the Bluemix dashboard into the Username and Password fields. Here are some screenshots to show where you can find the credentials and where to put them into the “HTTP Request” Node.
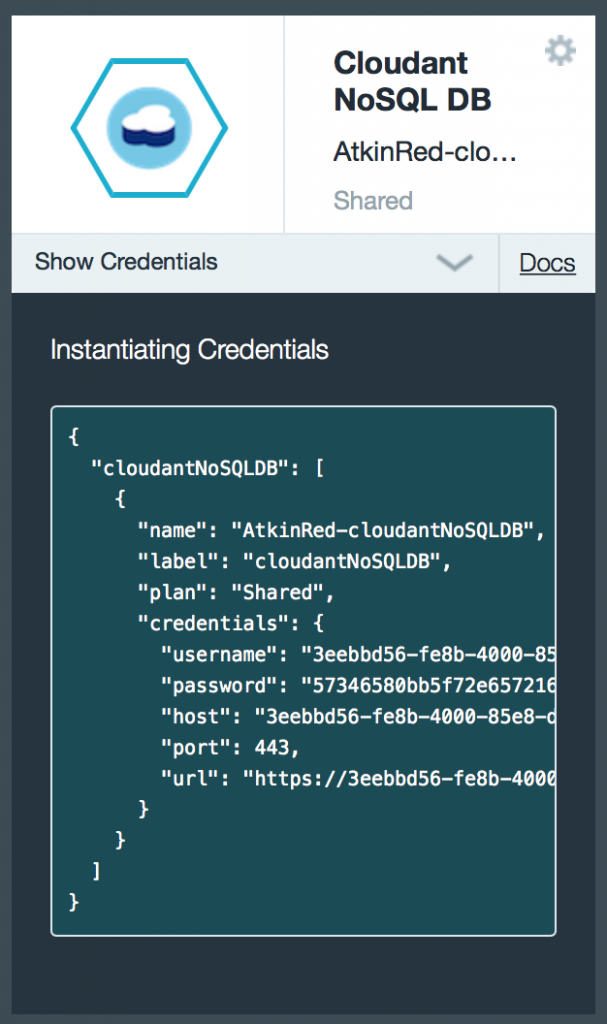
Cloudant Credentials
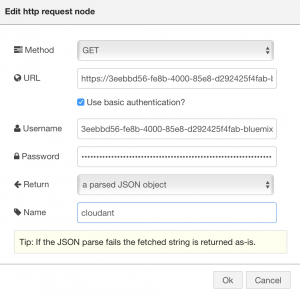
Cloudant Credentials

HTTP Request Node

HTTP Request Node

At this point we have a fully functioning private API running in Node Red. The URL to this private API will be the Bluemix route you used when you created your Bluemix application with “/tolls” appended to it. In my case, the full route to my private API is https://atkin.mybluemix.net/tolls.

The next step to making our API generally available to users is to have API Management generate a public interface that we can publish into Bluemix organizations catalogs. To use API Management you simply need to add the API Management service to your Bluemix application.

In this blog post we won’t go though all the steps of creating an API plan and how to publish an API to a Bluemix organization. For more details on how to do that you can see my earlier blog post on building secure APIs on Bluemix. The important thing to remember about connecting your public API on IBM API Management to your private API implementation is that you need to use the “username” and “password” that you established in the “HTTP Authentication” node. You also need to use assemble rather than proxy. Here is a screen shot that shows where to input the URL to your private API on Node Red and where to put the “username” and “password”. After you do this you can follow the standard process for publishing an API and plan to Bluemix organizations from IBM API Management.
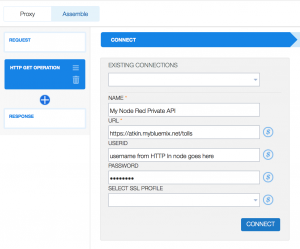
API Management

API Management

I hope this post shows you how quickly you can create a secure API that connects to a map reduce view in Cloudant with nearly no code.

‹ previous posts next posts ›
close
search
Latest Tweets

Hi, guest!

settings

menu